
Ultimate DIY CCTV Installation Singapore Guide: Secure Your Home Like a Pro in Just One Weekend!
Introduction to CCTV Installation in Singapore
In the bustling city-state of Singapore, where urban living meets the need for enhanced security, CCTV installation Singapore has become essential for homeowners seeking peace of mind. Whether you’re in an HDB flat, condo, or landed property, installing a CCTV system can deter intruders, monitor your property remotely, and provide valuable evidence if needed. This comprehensive DIY guide is tailored for Singapore residents, covering everything from legal considerations to step-by-step setups for both wireless and wired systems. With rising concerns over home security in areas like theft or package pilfering, a well-installed CCTV setup can be completed in just one weekend, saving you hundreds on professional fees. We’ll incorporate Singapore-specific tips, such as complying with HDB regulations and PDPA (Personal Data Protection Act) guidelines, to ensure your installation is legal and effective. No prior experience? No problem—follow along, and you’ll secure your home like a pro!

Why Choose DIY CCTV Installation in Singapore?
Opting for DIY CCTV installation Singapore offers numerous benefits, especially in a cost-conscious environment like ours. Professional services can cost $100 – $2,000++, but DIY kits from brands like Hikvision or TP-Link are affordable (starting at $34).
Key advantages include
- Cost Savings: Avoid labor charges while customizing your setup.
- Flexibility: Install at your pace, ideal for busy Singaporeans.
- Learning Opportunity: Gain tech skills for future maintenance.
- Compliance Control: Ensure adherence to local laws, such as not invading neighbors’ privacy in HDB corridors.
However, DIY isn’t for everyone—if you’re uncomfortable with tools or wiring, consider hiring pros. We offer expert CCTV installation Singapore; contact us via WhatsApp for a quote!
Legal Regulations for CCTV Installation in Singapore
Before starting your CCTV installation Singapore, understand the rules to avoid fines. Under the PDPA, you must:
- Notify others (e.g., via signs) if cameras capture public areas.
- Avoid recording private spaces like neighbors’ windows, facing their door and building facade.
- For HDB flats: Indoor cameras are unrestricted, but corridor-facing ones need to inform your town council.
Always prioritize privacy: Cameras should focus on your property. For detailed guidelines, check the HDB website or consult a professional.
Wireless CCTV Installation Guide: Simple and Cable-Free
Wireless systems are ideal for CCTV installation Singapore in apartments or rentals, as they minimize drilling and work well with Singapore’s strong Wi-Fi networks. This general guide suits most brands like Tapo; steps may vary slightly—refer to your manual. Setup per camera takes 2–5 minutes.
Step-by-Step Wireless CCTV Setup
- Power the Camera: Plug into a power source (skip for battery models). Use outdoor-rated extensions if placing outside, considering Singapore’s rain.
- App Setup: Download the app (e.g., via App Store/Google Play), create an account, and add the device.
- Connect to Temporary Wi-Fi: The camera generates its own Wi-Fi—switch to it in your phone settings.
- Link to Home Network: Back in the app, select your home Wi-Fi (ensure a strong signal; Singapore homes often have mesh systems for better coverage).
- Format Storage: Insert and format the SD card via app settings for local recording.
Position cameras in high-traffic areas like entrances or balconies. Options include:
- Tabletop in living rooms or kitchens.
- Bedrooms, hallways, or meeting rooms for indoor use.
- Garages or outdoor spots (if waterproof and near power outlets).
Optional Mounting for Wireless Cameras
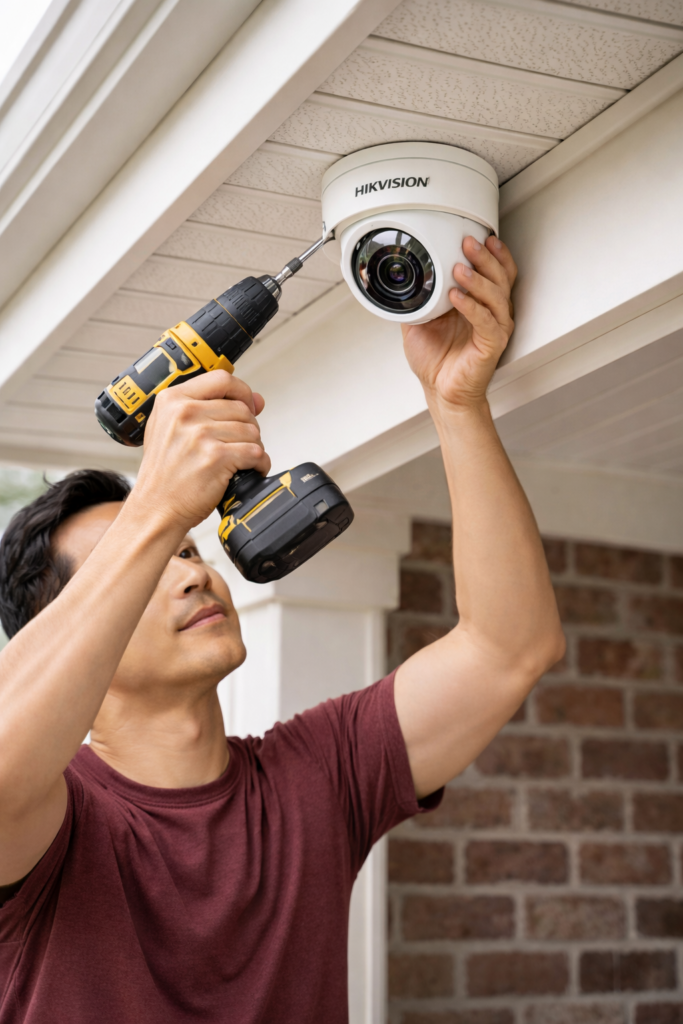
For permanence, mount on walls/ceilings (warning: drilling creates holes—test placements first to avoid regrets!).
- Mark spots with a pencil (consider HDB height limits).
- Drill and secure the bracket with screws (included in kits).
- Slide in the camera and connect power.
- Hide cables with trunking or cable ties; use false ceilings if you have them.
- In the app, invert the image if ceiling-mounted.
These steps can be tricky in humid conditions; if installation is outdoors, please ensure cameras are IP65-rated for weather resistance. If drilling daunts you, our team provides seamless CCTV installation Singapore—reach out below!
Wired CCTV Installation Guide: Reliable for Larger Setups
Wired systems, using POE (Power over Ethernet), offer stable footage without Wi-Fi drops—perfect for CCTV installation Singapore in larger homes or businesses. Components: Camera, NVR, HDD, and Cat6 cable. Brands like Hikvision or VIGI are usually plug-and-play.
Preparing the NVR
- Install HDD: Unscrew the NVR, insert the surveillance-grade hard disk, connect cables, and secure.
- Connect Peripherals: Place near your router and monitor. Use HDMI for display and Cat6 for internet.
- Initial Setup: Power on; choose quick/manual mode to set date, time, and password (note it down securely).
- Mobile Connection: Download the app and scan the respective QR codes for mobile usage.
Camera Installation and Cabling
- Mount the Camera: Drill into the wall/ceiling at strategic spots (e.g., overlooking driveways—account for Singapore’s tropical sun with shaded positions).
- Measure and Prep Cables: Overestimate length; strip ends carefully without cutting wires.
- Crimp Connectors: Follow the T-568B standard (orange-white, orange, green-white, blue, blue-white, green, brown-white, brown). Use a crimping tool—watch tutorials for precision.
- Test Connection: Plug into NVR and camera; if no image, recheck cabling.
- Cable Management: Use trunking or false ceilings to hide wires (label them for future ease, especially in renovations). This prevents messes in Singapore’s compact spaces.

Wired installations can be messy—strongly recommend pros for complex wiring to avoid frustrations.
Best Practices for Camera Placement in Singapore Homes
To maximize your CCTV installation Singapore:
- Cover entry points: front doors, backyards, and lifts.
- Height: 2.5–3 m to prevent tampering.
- Lighting: Opt for IR or full-color night vision; test in low light.
- Weather: Use bullet cameras for rain-prone areas.
- Coverage: Refer to our lens guide for optimal angles—avoid blind spots.
Common mistakes: overlooking power sources, poor Wi-Fi, or privacy invasions.
Conclusion: Secure Your Singapore Home Today
This ultimate DIY CCTV installation Singapore guide empowers you to protect your property efficiently. While rewarding, it requires time—expect 4–8 hours for a full setup, with potential errors. For flawless results, trust our professional CCTV installation Singapore services. We handle everything from sales to setup—contact us via WhatsApp or the form below. Buy kits from us for guided support and maximize security!